Several weeks back, I was cleaning up my scratch space, where I store all my random code snippets for various questions which I receive on a regular basis and I came across a nifty little script that I had put together for a particular customer request. I had completely forgotten about it and I thought it could come in handy for some folks who might be curious in how their current vSAN Objects are currently being distributed across all vSAN Disk Groups within a vSAN Cluster.
RVC already provides a nice command called vsan.check_limits which gives you a break down of the number of components across all disks within a vSAN Cluster as shown in the screenshot below.

However, in the case of this particular customer, they wanted the break down on a per Disk Group level rather than individual disks.
Luckily, all of this information is already exposed using the vSAN Management APIs, you simply just need to aggregate it one level up. With that, I created a PowerCLI script called VSANObjectDistribution.ps1 which allows you to provide the name of a vSAN Cluster and it will automatically provide you with both the number of components distributed across the different vSAN Disk Groups as well as the amount of storage consumed by these components.
Here is a screenshot for a 3-Node vSAN Cluster where each ESXi host contains two vSAN Disk Groups:
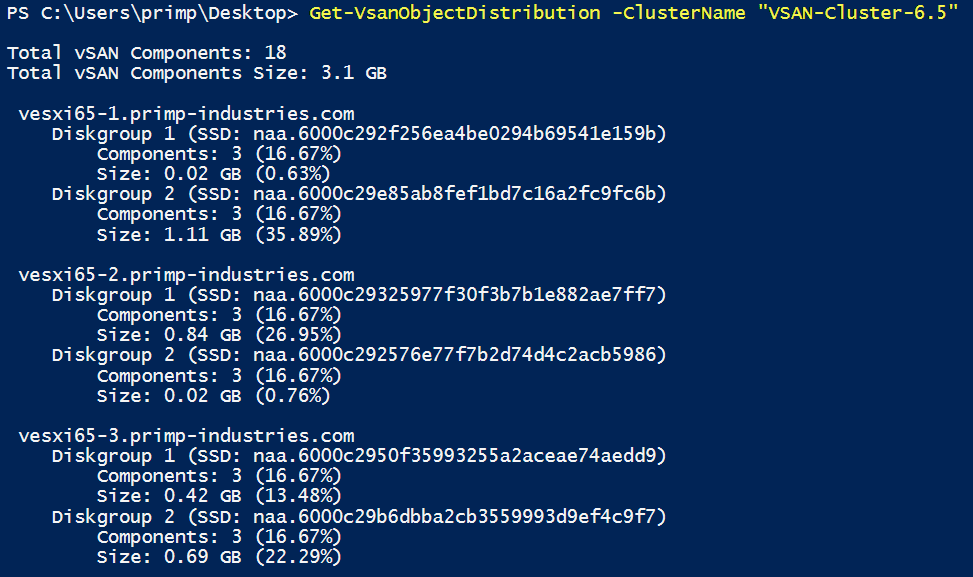
Since there is no actual number for a vSAN Disk Group, by default, I output the Canonical Disk Name of the "Cache" device for the given vSAN Disk Group so you can map it back.
If you prefer to see the vSAN UUID for the "Cache" device instead, you can simply set the -ShowvSANID parameter to true as shown in the screenshot below.

To correlate back the specific vSAN Disk Group, you simply select a particular vSAN Disk Group for the ESXi host you are interested in. At the bottom, add "vSAN UUID" column highlighted in orange and you can then compare either that ID or Canonical Disk Name highlighted in blue.

Thanks for the comment!