This post was inspired by a recent Twitter conversation with Joep Piscaer who ran into an interesting challenge with VSAN and NSX.
I want to apply a VSAN VM Storage Policy to a NSX Controller, but I’m getting an "The method is disabled by ‘vShield_SVM’” error. Any ideas?
— Joep Piscaer (@jpiscaer) December 31, 2014
The issue that Joep encountered was not being able to apply a VSAN VM Storage Policy onto an NSX Controller VM which resided on a VSAN Datastore. Below is a screenshot of the error message "The method is disabled by vShield_SVM" if you tried to apply the VM Storage Policy.

The reason Joep is seeing this error is because the NSX Controller VM is a special "Service VM" that is being managed by a specific solution, in this case it is VMware NSX. To ensure that users do not accidentally modify these "Service VMs", certain set of functionality has been disabled on these VMs from regular users. Any configuration changes that are required are initiated through the solution itself which has full administrative access to these VMs. This issue is actually not specific to the NSX Controller VMs but also applies to the NSX Edge VMs: ESR (Edge Service Router) and DLR (Distributed Logical Router).
In fact, this applies to any "Service VMs" which are being managed by a VMware Solution or 3rd party Solution. You will notice that you will not be able to edit these VMs like you would normally on other VMs. One suggestion from a community member was to check out the VMware KB 2008957 which has users manually tweaking the VCDB, which I am not a big fan of if I can help it. If you want to know why I do not recommend this, check out this post here where kittens might get harmed. Now, getting back to Joep's request, is there a solution for him? After all, his request is a valid one where he has deployed an NSX Controller VM on a VSAN Datastore and wishes to apply a specific VSAN VM Storage Policy.
Luckily, there is cleaner work around that does not involve messing around with the VCDB and crafting ugly SQL queries. The way these "methods" or operations are disabled on a particular set of VMs is through the use of a private vSphere API available through vCenter Server called disableMethods. You can actually view the list of disableMethods by viewing a particular VM using the vSphere MOB under config->disableMethod property as seen in the screenshot below.
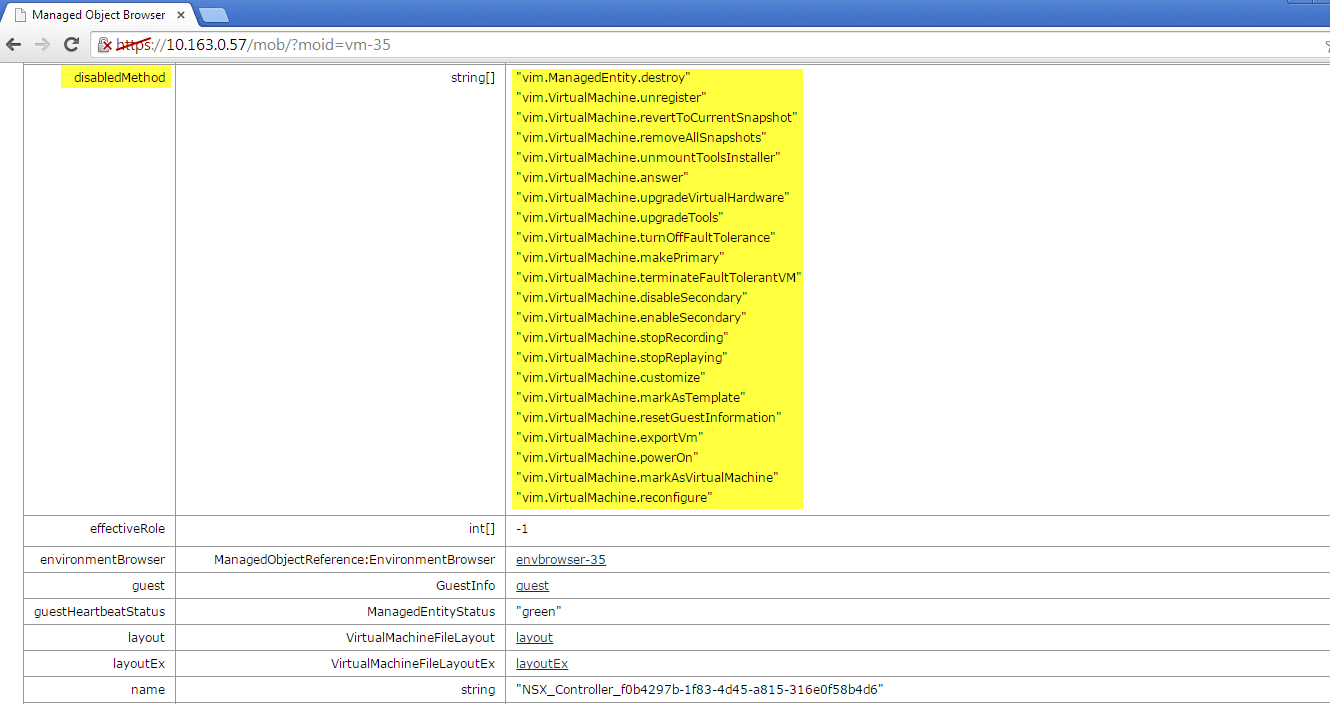
The list of disableMethods map to the specific vSphere API calls for a VM and in the case of modifying a VM which includes applying a VM Storage Policy, the method that is used is is called the ReconfigVM_Task which we can see in the screenshot mapping to vim.VirtualMachine.reconfigure. If we want to be able to apply a VM Storage Policy, we simply just need to temporarily remove this particular operation from the disabbleMethods list.
Here are the instructions for enabling ReconfigVM_Task method:
Step 1 - You will need to find the MoRef (Managed Object Reference) ID of the VM that you wish to enable the method on. You can do this by either browsing through the vSphere MOB, using this vSphere SDK for Perl script or this PowerCLI snippet:
Get-VM -Name [VM-NAME] | ft -Property Id
Step 2 - Open a web browser to the following URL:
https://[VC-IP]/mob/?moid=AuthorizationManager&method=enableMethods
Step 3 - You will need to replace the following two parameters (make sure to replace the VM MoRef ID with the one you found in Step 1):
| parameter | value |
|---|---|
| entity | <entity type="ManagedEntity" xsi:type="ManagedObjectReference">vm-35</entity> |
| method | <method>ReconfigVM_Task</method> |
Step 4 - Once you have updated fields as shown in the screenshot below, to execute the API call you just need to click on the "Invoke Method" link on the bottom right.

If everything was successful, you should see some output from the operation listing the methods that are still currently disabled. You can also confirm that everything is working by refreshing the vSphere Web Client or if you are using the vSphere C# Client, the "Edit Settings" option should now be available. Lastly, if I now apply a VSAN VM Storage Policy, I will no longer get the error and as you can see from the screenshot below, I now have successfully applied my "VSAN-Platinum-VM-Storage-Policy" for my NSX Controller VM. I would strongly recommend that you re-enable the original disable method by following the instructions below.

Here are the instructions for disabling ReconfigVM_Task method:
Step 1 - You will need to find the MoRef (Managed Object Reference) ID of the VM that you wish to enable the method on. You can do this by following Step 1 from the enable instructions
Step 2 - Open a web browser to the following URL:
https://[VC-IP]/mob/?moid=AuthorizationManager&method=disableMethods
Step 3 - You will need to replace the following three parameters (make sure to replace the VM MoRef ID with the one you found in Step 1 and any random number works for sourceId property):
| parameter | value |
|---|---|
| entity | <entity type="ManagedEntity" xsi:type="ManagedObjectReference">vm-35</entity> |
| method | <DisabledMethodRequest><method>ReconfigVM_Task</method><DisabledMethodRequest> |
| sourceId | 1234 |
Step 4 - Once you have updated fields as shown in the screenshot below, to execute the API call you just need to click on the "Invoke Method" link on the bottom right.

If everything was successful, you should see a void output and if you go to your vSphere Web/C# Client, you should see that the "Edit Settings" option is now disabled again for this VM. Though applying a VSAN VM Storage Policy is pretty trivial, there are some additional things to be aware of when working with special "Service VMs" like the NSX Controller. Hopefully we can improve this workflow in the future and provide for a better user experience but in the mean time, you can use this workaround.


