• Skip to primary navigation
  • Skip to main content
  • Skip to primary sidebar

virtuallyGhetto

  • About
  • Privacy
  • VMware Cloud
  • Home Lab
  • Nested Virtualization
  • Automation
    • VMware Kickstart
    • VMware API/SDK/CLI
    • VMware vMA/VIMA
    • VMware OVF / OVFTOOL
  • Apple Mac
  • VCSA
  • VSAN

vCO

Extending VSAN capabilities in the vSphere Web Client using vCO

05/29/2014 by William Lam Leave a Comment

One of my favorite features of vCenter Orchestrator is how easy it is to extend an existing vCO workflow and making it available directly in the vSphere Web Client. I think this is still not a very well known feature of vCO, but once you realize the capability of this feature, you will see how powerful it is to be able to provide context aware workflows in the vSphere Web Client. Another thing to be aware of is that vCO also provides full access to the underlying vSphere API, this means you can easily expose new functionality that may not exists in the vSphere Web Client.

A good example of this is a recent workflow that I created to extend some additional VSAN information directly in the vSphere Web Client. I wanted to be able to easily view the number of VSAN components for each of my ESXi hosts. Since this information is available through the vSphere API which I wrote about here, I was able to create a vCO Workflow which exposed this information and then make it available in the vSphere Web Client.

To get started, you will need to download the workflow and an updated vCenter vCO Plugin as it contains a fix for leveraging the VSAN APIs:

  • List VSAN Host Component Count.workflow
  • vCenter vCO Plugin 5.5.2 (currently in Tech Preview)

In the example below, I am using the vCO Appliance but the steps are very similar if you are using the Windows version.

Step 1 - Upload the o11nplugin-vsphere.dar.zip to your vCO Appliance

Step 2 - Unzip the contents by running the following command:

unzip o11nplugin-vsphere.dar.zip

Step 3 - Run the following command to set the appropriate ownership and permissions:

chmod 644 o11nplugin-vsphere.dar
chown vco:vco o11nplugin-vsphere.dar

Step 4 - Backup the original vCenter vCO Plugin by running the following command:

mv /usr/lib/vco/app-server/plugins/o11nplugin-vsphere.dar /usr/lib/vco/app-server/plugins/o11nplugin-vsphere.dar.bak

Step 5 - Copy the new plugin to the plugins directory by running the following command:

mv o11nplugin-vsphere.dar /usr/lib/vco/app-server/plugins

Step 6 - Restart the vCO Service to load the new plugin

/etc/init.d/vco-server restart

Once the vCO Server is available, you can login to the vCO Client and import the new VSAN workflow. To make the workflow available in the vSphere Web Client, you will need to login to the vSphere Web Client using an account that has access to the vCO Server and the instructions below.

Step 1 - Click on the vCO icon on the home page and then select Manage and Context Actions

Step 2 - Click on the green arrow to add a new worfklow

Step 3 - Browse for the VSAN workflow and then click on the Add button and associate the workflow with a vSphere Cluster object as seen in the screenshot below:

vsan-vco-plugin-0
Once the context workflow has been added, you are now ready to run the new VSAN workflow! Right click on a VSAN enabled vSphere Cluster and under the All vCenter Orchestrator Actions, you should see our workflow:

vsan-vco-plugin-1
Go ahead and run the workflow and once it completes, you can view the results by clicking on the workflow name in the Recent Tasks:

vsan-vco-plugin-2
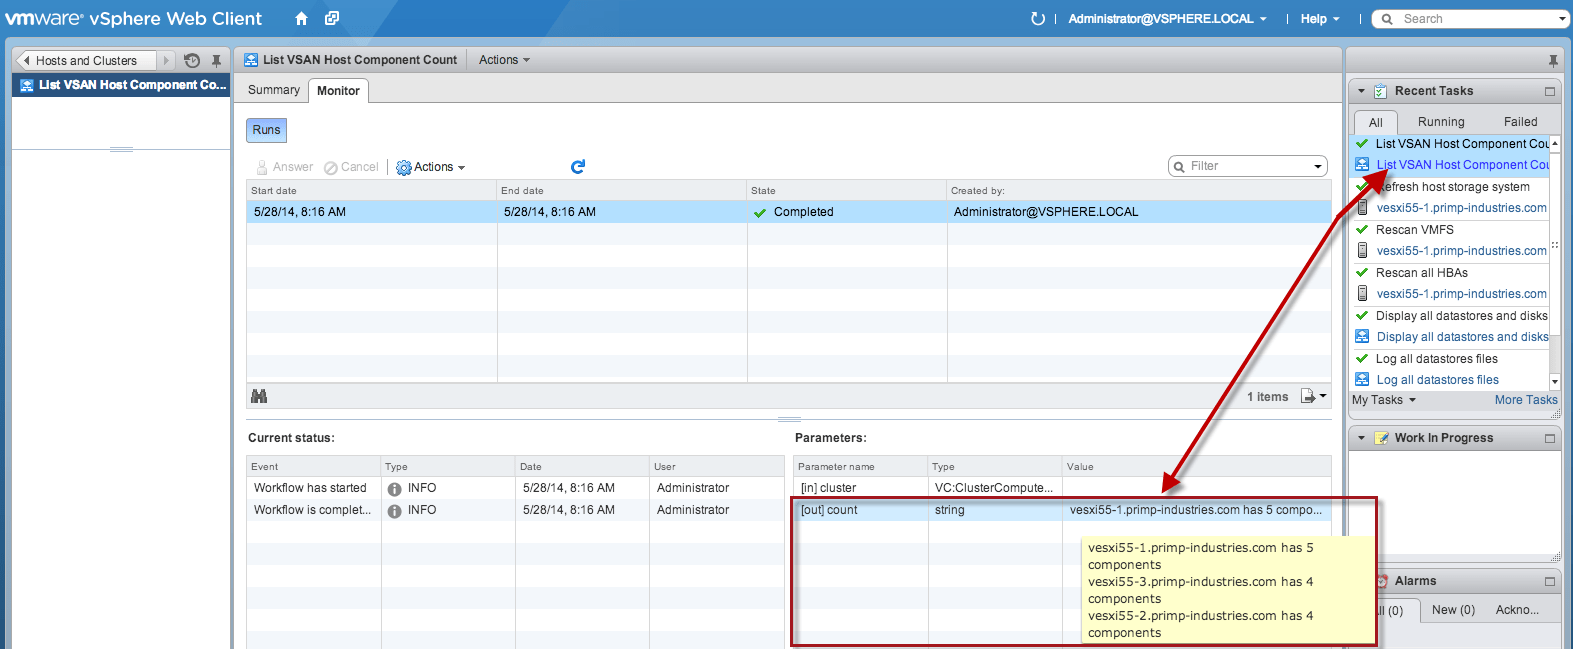
Under the Parameters section, we can see our input and output variables. In this workflow, I have created a String output called "count" which contains the name of each ESXi host in the VSAN Cluster along with the number of corresponding components.

As you can see, you can easily enhance the functionality of the vSphere Web Client by simply extending it with either out of the box or custom vCO Workflows that you have created. Happy workflowing!

Share this...
  • Twitter
  • Facebook
  • Linkedin
  • Reddit
  • Pinterest

Filed Under: ESXi, VSAN, vSphere 5.5, vSphere Web Client Tagged With: esxi 5.5, vcenter orchestrator, vCO, VSAN, vSphere 5.5, vSphere API, workflow

Quick Tip – Automate the export of a vCenter Orchestrator workflow using the CLI

08/14/2013 by William Lam 5 Comments

Steve Jin recently wrote an article about vCenter Orchestrator REST APIs: Executing Workflow which reminded me of an interesting issue that I had faced several months back. I had just finished developing a custom workflow on a beta version of vCenter Orchestrator and of course one of the challenges with using early software is that it could be unstable. I was unable login to the vCO interface via vSphere Web Client or the vCO Client to export my workflow through the regular UI interface. I tried everything and I thought I might have lost my workflow!

I reached out to one of the vCO engineers and asked if there was an easy way to recover my workflow and it turns out there was a very simple method IF the vCO REST API endpoint is still accessible, which it was. To test this, you can either use cURL on the command-line or your favorite REST Client for your browser and perform a GET operation on the following URL (replace the URL with the URL of your vCO Server):

https://vco.primp-industries.com:8281/api/workflows

Note: The vCO REST API is only available starting with vSphere 5.1

If the command was successful, you should see a list of all the workflows in your vCO Server:

I am not aware of any filtering that can be done to narrow down the specific vCO Workflow, but if you are using a browser-based REST Client, you can just search for the name of your workflow. In the above example, I am interested in the "Change Guest OS Type" workflow and you can see its corresponding vCO Workflow ID which is highlighted.

To export and save the vCO Workflow to your local system, you just need to perform a GET operation on the vCO Workflow URL and specify "Accept:application/zip" for the request header which will allow you to save the vCO workflow.

Here is an example using cURL to export the  vCO Workflow and save to a file called ChangeGuestOS.workflow:

curl -i -k -u vcoadmin -H "Accept:application/zip" -X GET https://vco.primp-industries.com:8281/api/workflows/7D808080808080808080808080808080BC818080013141141566711a974a8fef8 -o ChangeGuestOS.workflow

Share this...
  • Twitter
  • Facebook
  • Linkedin
  • Reddit
  • Pinterest

Filed Under: Uncategorized Tagged With: export, REST API, vcenter orchestrator, vCO, workflow

Automate vCenter Orchestrator Configuration Backups

03/29/2013 by William Lam Leave a Comment

Last year I wrote an article on how to quickly configure a new vCenter Orchestrator 5.1 appliance which automatically goes through the necessary steps of configuring your vCO appliance and enabling the vCenter Server plugin and associating it with your vCenter Server. These steps are usually performed manually, but when you are looking at deploying multiple vCO instances or even quickly spinning up vCO appliance for testing, this will definitely help speed up your deployment.
Something that I did not consider after completing the vCO setup was backups. Fortunately, this was something that was shared with me recently from a customer who had this exact workflow on backing up their vCO configuration after their initial deployment. This may not be a very well known feature, but vCO provides a very simple mechanism to export your vCO configurations and allows you to restore the configuration in case of a miss-configuration or even deploying a similar configuration to another vCO instance.
Using the same HTTP request trick, to export the vCO configuration you would need to make a request to the following URL:

https://${VCO_IP_ADDRESS}:8283/config_general/ExportConfig_export.action

Similar to the vCO UI, the backup will be stored on the vCO appliance itself and the path will be provided back to you in the message response. To help demonstrate this, I created a simple shell script called backupVCO51.sh which is similar to the setup script in my previous blog article. You can easily take the few lines of code and integrate that with the setup script.

Here is a screenshot of running the backup script:

From the output we can see where the backup configuration is stored on the vCO appliance and you can easily copy the backup to an external system using SCP.

Whether or not you are automating your vCO setup, you should definitely consider performing periodic backups of your vCO configuration, especially before making any changes to your vCO Server.

Share this...
  • Twitter
  • Facebook
  • Linkedin
  • Reddit
  • Pinterest

Filed Under: Uncategorized Tagged With: appliance, vcenter orchestrator, vCO, vSphere 5.1

Changing GuestOS Type Using a Custom vCO Workflow in the vSphere Web Client

10/01/2012 by William Lam 6 Comments

Something you might not have noticed, is the fact that you can not change or modify the guestOS type after a virtual machine has been created in the new vSphere Web Client, this option is just grayed out.

Though this is a change in behavior compared to the old vSphere C# Client, I actually took this as an opportunity to try out one of the most interesting and unrealized feature in the vSphere 5.1 release. This feature being a tighter integration between vCenter Server and vCenter Orchestrator. This means that you can now take any of your existing vCO workflows or create new workflows and make them directly available to any of the vSphere objects within the new vSphere Web Client as a custom action. 

Note: A feature request/bug has already been filed with VMware to have the ability to change the Guest OS and Guest OS Version for a virtual machine after creation in the vSphere Web Client.

Here is an example of a custom workflow that I created called Change Guest OS Type and as you can see that it only shows up under the context of a virtual machine object in the vSphere Web Client. 

From my perspective, the use cases are endless as you can create ANY custom workflow to perform any action or series of operations that can span across VMware products as well as 3rd party systems and directly present them to your end users in the new vSphere Web Client. Not only that, users can specify which workflows they see by default on a given vSphere object and this can differ from user to user based on their daily set of tasks.

So going back to our scenario, here is a way to change the Guest OS and Guest OS Version using a custom vCO workflow.

Step 1 - Download Change Guest OS Type vCO workflow to local desktop.

Step 2 - Open up the vCO Workflow Client, you can do this by pointing your browser to your vCO Server and click on "Start Orchestrator Client" link.

Step 3 - Import the Change Guest OS Type vCO workflow from your desktop to your vCO Server

Step 4 - Next, we need to go to the vSphere Web Client to make this vCO workflow available on a particular vSphere object, in our case it is a virtual machine. On the home page of the vSphere Web Client, click on "vCenter Orchestrator" icon in the center pane or select it from the navigation pane on the left. Once you are in the vCenter Orchestrator configuration page, select the "Manage" tab and click on the "plus" icon.

In this view, you can specify which default vCO workflows are made available across the various vSphere objects. These can be modified or removed based on the frequency of workflow usage.

Step 5 - Locate the Change Guest OS Type vCO workflow on the left hand side and then click on the Add button. Finally, select type to be virtual machine as this workflow is only applicable to a VM and OK to save the settings.

If we take a look at the vCenter Orchstrator configuration page, we will see our new workflow is now listed as one of the defaults for a virtual machine object. You can edit and modify any of these based on the workflows you wish to see by default. I highly recommend you add workflows that you use frequently so you do not have to search through the entire list each time.

Finally, it is time to test drive our new workflow! Locate a virtual machine and right click on the object, in a second you should see a sub-menu for All vCenter Orchestrator Actions and then select our vCO workflow Change Guest OS Type which will start off a very familiar wizard.

The first screen is the object selected, which in our case is our virtual machine. You can of course change this, but we will leave it as it's context was automatically picked up.

The next screen is to select the Guest OS Family (Windows, Linux & Other) that you wish to modify your virtual machine to.

The last part is just to select the Guest OS Version which is provided as a list of the guest OSes based on your previous selection.

To apply the Guest OS change, just click finish and watch the vCO workflow execute.

Though the functionality of changing the Guest OS is not available in the new vSphere Web Client, you can still provide the same functionality to your end users through a custom vCO workflow which are now tightly integrated into the vSphere Web Client. Hopefully this sparks some ideas on other vCO workflows you can create or expose through the vSphere Web Client in your own environment. I know I have a few in mind 🙂

A big thanks goes out to Christophe Decanini for helping me with a few questions while creating this workflow.

Share this...
  • Twitter
  • Facebook
  • Linkedin
  • Reddit
  • Pinterest

Filed Under: vSphere Web Client Tagged With: guest, guest os, vcenter orchestrator, vCO, vSphere 5.1, vsphere web client, workflow

Quickly Configuring the New vCenter Orchestrator 5.1 Appliance

09/25/2012 by William Lam 5 Comments

Have you checked out the latest release of vCenter Orchestrator 5.1? If not, you should really consider taking a look as there are number of significant enhancements in this release. Deploying the vCO 5.1 virtual appliance is a quick and easy way of getting started and that is what I used to test drive the new vCO 5.1. One thing I noticed after deploying the appliance is that vCO now requires a few more steps for configuration and that means more clicking and longer wait before I can get started!

As you probably may have guessed, I had to look for a better way of setting up vCO so that I can get started faster! As far as I knew, there were no configuration utilities or APIs that I could leverage and all configuration changes had to be done through the vCO configuration web interface. After clicking around for a bit, I realized I could "ghetto" it by just sending in the raw HTTP requests the UI was performing. I ended up writing a very simple shell script and using Firebug, a very handy tool that I used from time to time to help me figure out what each request looked like.

Disclaimer: This is for educational purposes only, this is not officially supported by VMware. Please test this in a development environment before using it on actual systems.

You can download the script here called configureVCO51.sh

To use the script, you just need a machine with curl, you do not need to copy the script to your vCO server. You will need to edit the following variables in the script before executing:

VCO_IP_ADDRESS=172.30.0.203
VCO_DEFAULT_USERNAME=vmware
VCO_DEFAULT_PASSWORD=vmware
VCO_NEW_PASSWORD=vmware123
VCENTER_IP_ADDRESS=172.30.0.181
SSO_IP_ADDRESS=172.30.0.181
VCENTER_USERNAME=root
VCENTER_PASSWORD=vmware

The variables should be pretty self explanatory, you will need to provide the IP Address of your vCO Server and the default username/password for the vCO 5.1 appliance is vmware/vmware. You will need to specify the new password that you wish to set and then provide information about your vCenter Server as well as your vCenter SSO Server. In this example, I used the VCSA.

Note: The script currently assumes you will be using System-Domain\__Administrators__ as the admin group, if you decided to user another group, you will need to edit the confirmSSOServer section of the script. I also used the VCSA

Here is an example execution of the script:

The numbers on the left hand side of each task is the HTTP return code and as you can see, the script not only setups the vCO appliance but also enables the vCenter Server vCO plugin as well as adding in your vCenter Server 5.1 and then automatically restarting the vCO service for all changes to take effect. I timed my script versus a manual configuration (assuming you know exactly what to do), I was still able to get everything configured in less than 1.5minutes where as the manual clicking and waiting took almost 5minutes (remember, I knew exactly what to click on which means it could take even longer!).

At the end of the script, you should be presented with two URLs: one that takes you straight to the vCO configuration web interface in case you wanted to check or verify the settings and the other is the vSphere Web Client URL for your vCenter Server.

Here is a screenshot of the vCO configuration interface, we can see that everything is showing green for it's status:

Here is a screenshot of the vSphere Web Client and we can see that our vCO Server has been configured and is now accessible to us within vCenter Server.

This script can easily be modified to perform other operations within vCO (e.g. enabling other plugins/configurations), this was just a sample of what you could do. To add or modify other functionality, you just need to use Firebug and watch for the specific HTTP request that is made while you are manually performing the task in the vCO configuration interface. For more details on setting up the new vCO 5.1 appliance, I highly recommend you check out Christophe Decanni's vCenter Server & vCenter Orchestrator 5.1 integration tips doc.

Additional Resources: 

  • Unattended Deployment of vCenter Orchestrator Virtual Appliance
Share this...
  • Twitter
  • Facebook
  • Linkedin
  • Reddit
  • Pinterest

Filed Under: Uncategorized Tagged With: appliance, vcenter orchestrator, vCO, vSphere 5.1

Org vDC to vCenter Resource Pool Workflow Using vCenter Orchestrator

04/06/2012 by William Lam Leave a Comment

I was helping a colleague of mind this evening with a question about retrieving a vCenter Resource Pool given a vCloud Director Organization vDC using vCenter Orchestrator. However, this particular workflow does not exists out of the box with vCO, but with a little help from the vCloud API, we can easily create our own workflow to accomplish this request. We will be leveraging the Query Service introduced in vCloud Director 1.5 and the "orgVdcResourcePoolRelation" query type which provides a mapping between an Org vDC to vCenter Resource Pool.

You can download the vCO workflow that I created called Get Org vDC to Resource Pool Mapping and import it into your vCO environment. You will need to make sure you have the vCloud Director vCO plugin installed.

Here is a example of running the workflow which accepts a vCloud Director Org vDC:

Here is the results of the workflow:

You will notice that it produces the MoRef (Managed Object Reference) to a vCenter Resource Pool instead of the actual Resource Pool object. The reason for this is the query only returns the href of the Org vDC, href of vCenter Server and the MoRef of the Resource Pool. Using the MoRef, you can connect to your vSphere environment and retrieve the Resource Pool, but I will leave that as an exercise for my colleague 🙂

Note: If you go through the query types, you may have noticed the resourcePool query type, the reason this will not work is that it only provides a list of root Resource Pools (basically vSphere Clusters) and it does not return the sub-resource pools that are created for Organization vDCs.

Share this...
  • Twitter
  • Facebook
  • Linkedin
  • Reddit
  • Pinterest

Filed Under: Uncategorized Tagged With: orchestrator, org vdc, query service, resource pool, vcd, vcloud director, vCO

  • Go to page 1
  • Go to page 2
  • Go to page 3
  • Go to Next Page »

Primary Sidebar

Author

William Lam is a Senior Staff Solution Architect working in the VMware Cloud team within the Cloud Services Business Unit (CSBU) at VMware. He focuses on Automation, Integration and Operation for the VMware Cloud Software Defined Datacenters (SDDC)

  • Email
  • GitHub
  • LinkedIn
  • RSS
  • Twitter
  • Vimeo

Sponsors

Privacy & Cookies: This site uses cookies. By continuing to use this website, you agree to their use.
To find out more, including how to control cookies, see here: Cookie Policy